Prisms are complex optical components. Transmitted wavefront performance is controlled by multiple surfaces, the angle between them, and the material homogeneity. SCI makes interferometric prism measurement fast, easy and more accurate than conventional methods.
Conventional Approach: Multiple Instruments, Delayed Shipments
Prisms are typically measured on multiple instruments and in several setups. A goniometer measures angles, and an interferometer measures the surface flatness of S1 and S2, and transmitted wavefront (which includes the homogeneity). And in a separate set up, the relative angles are measured in an interferometer. Multiple instruments and setups increase the time of measurement, slowing manufacturing and delaying the shipment of finished parts.
Laser Fizeau: a Compromised Measurement

Complicating the laser Fizeau measurement are multiple back surface reflections between surfaces S1 and S2 and the transmission flat (TF) and reference flat (RF). Workarounds exist that add time and degrade the measurement accuracy while also increasing risk of component damage.
Surface Flatness with Laser Fizeau
Back reflections from S1 and S2 force the user to frustrate the fringes on the opposite surface by painting or greasing. The procedure is to paint S2, measure S1, strip the paint off S2 and paint S1, the measure S2, clean S1 and continue processing; this cycle is repeated until the prism meets specification.
Transmitted Wavefront with Laser Fizeau

Transmitted wavefront measures the wavefront passing through the prism, and consequently through S1 and S2. To suppress multiple reflections the prism must be rotated so the light reflected off these surfaces falls outside the interferometer’s acceptance angle. Thus the transmitted wavefront measured in a laser Fizeau is not in the “as used” unrotated orientation.
SCI Simplifies the Measurement
Spectrally Controlled Interferometry (SCI) simplifies and speeds up the measurement process. Now all four parameters can be measured in one setup with no preparation for increased accuracy, faster cycle time and lower risk of damage.

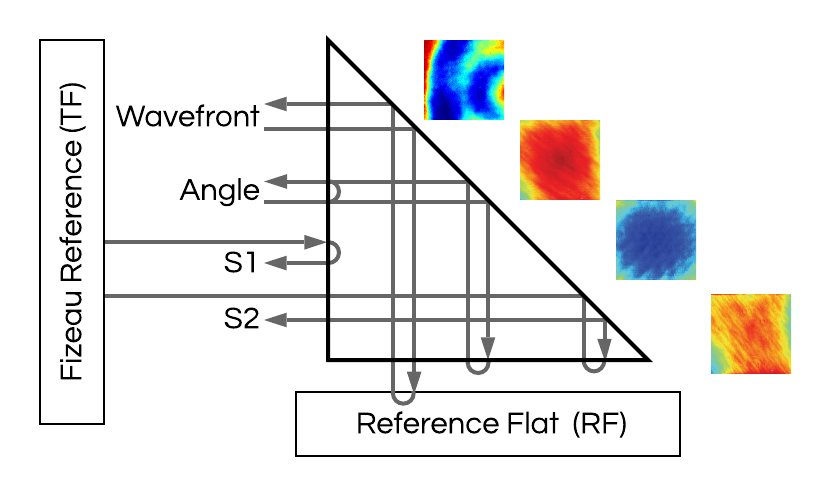
With SCI, no surface preparation is required. Setup the prism as shown in Figure 1. With SCI, the prism measurement is first set up in a long coherence mode, similar to that of a laser Fizeau. This allows fringes to be quickly observed and nulled for multiple cavities at once, making setup fast and precise. Next, the SCI source is placed in the short coherence mode to localize fringes to a single cavity. Individual measurements can now be made by electronically selecting each of the four cavities, one at a time. First, surface figure is evaluated by selecting the interference between the transmission flat ( TF reference surface) and S1 is selected and measured, followed by the transmission flat and S2. Then the S1-S2 cavity, the relative prism angles, is selected and measured. Finally the TF to RF cavity is measured for transmitted wavefront.
All these measurements were made in one setup without preparation and can be done in less than five minutes including setup, a greater than 10X savings in time, with increased accuracy and lower chance of damaging the part.
Summary
Tradition methods to measure a prism are time consuming, with lower accuracy, potential causing damage to the part. New Spectrally Controlled Interferometry (SCI) maintains the ease of setup with long coherence fringes and then measures all critical parameters without surface preparation and too higher accuracy.
